
Anyone with a lifetime of experience with horses has learned and knows all too well that injuries and accidents/emergencies happen when you least expect them. One of the many important skills needed for mastery owning a horse is the ability to put an appropriate bandage on an injury, It follows that the nature of the wound or injury will affect the type and application of the needed bandage. We've compiled a few basic principles to help horse owners in this email.
You should also recognize that pressure bandages can be potentially harmful if not applied correctly. If you know how to correctly apply a pressure bandage, you can come to the horse’s aid without causing further damage. When a horse sustains a serious tendon or ligamentous leg injury or laceration, it is sometimes necessary to stabilize the limb and control bleeding and swelling until your vet arrives. A pressure bandage is an effective first aid tool that can be used to accomplish this task. Keep in mind, however, that any leg injury, serious enough to require a pressure bandage, is serious enough to require immediate professional attention to ensure appropriate primary targeted therapy for the best outcome.
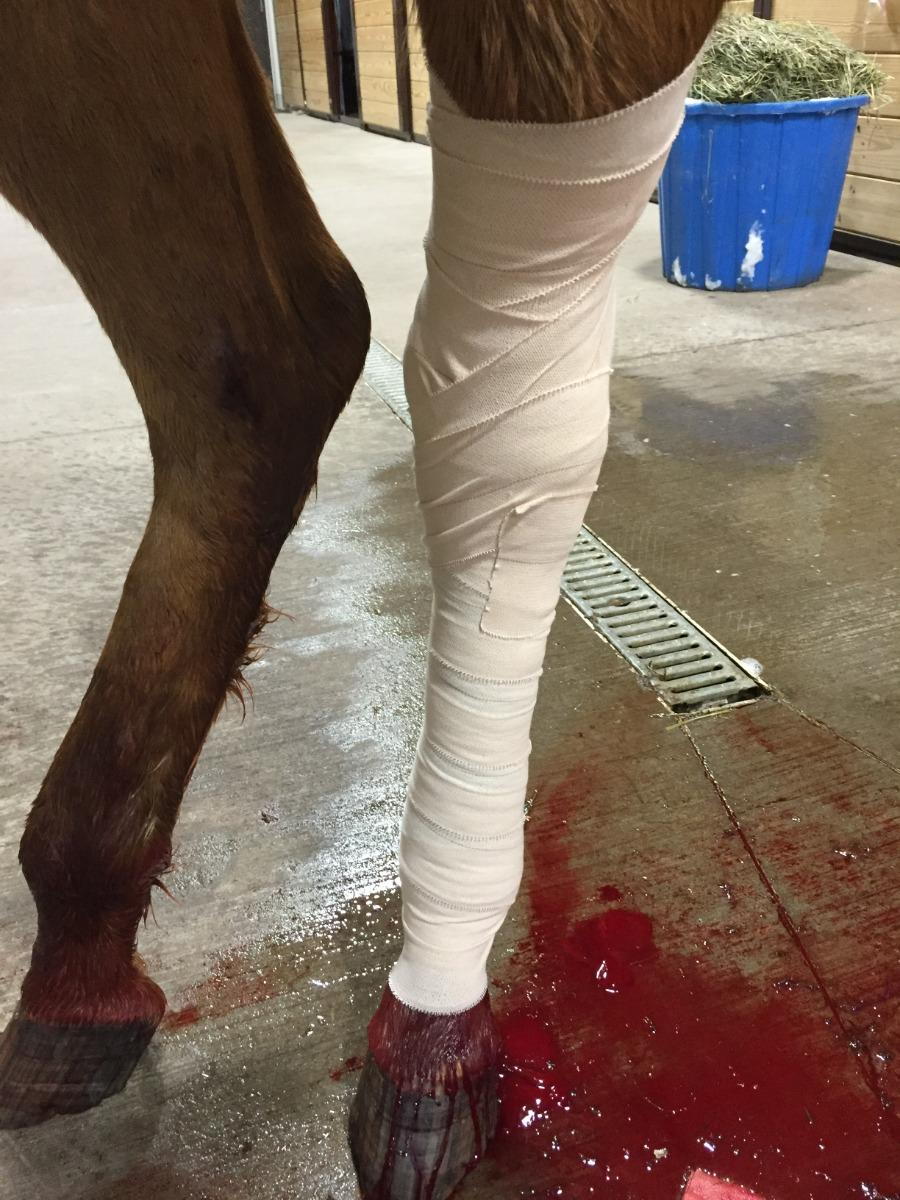
Take for instance the pressure bandage. The purpose of the pressure bandage is to protect the injured area and control bleeding or further swelling without constricting normal circulation.
Pressure bandages are used to treat wound in order to:
- Control Bleeding
- Minimize swelling
- Provide support for an injured limb
- Absorb fluids (exudates) from a wound
- Protect a wound from contamination or additional trauma
The severity or type of injury again will determine the best course of action. A type of pressure bandage may be needed over an acute injury with an open wound to minimize further contamination, infection and afford the best chance for optimal surgical treatment. If there is an open wound with profuse bleeding, or it appears that a major blood vessel has been cut (blood appears to spurt not trickle), your primary concern will be to stop the bleeding and avoid contamination. You will likely want to gently clean any gross contamination with salinewill probably need to forego cleaning and apply pressure to the wound immediately. If the bleeding is light to moderate, it may be best to cleanse the wound using cool running water from a hose prior to bandaging. Avoid prolonged hosing (not more than 10 to 12 minutes) as it may increase swelling.

A commercially available sterile saline solution or a solution of two tablespoons plain table salt to one gallon of water, can also be used. Ideally, the saline solution should be applied with pressure to loosen and flush dirt and debris from the wound. A couple one litre bags of saline in a tack bag can easily fill this purpose as they can be made into a waterpick to clean wound; Simply cutting a small hole at the corner of a bag and squeezing the bag will enable a gentle rinsing of many types of wounds. Avoid scrubbing an open wound with betadine scrub, as this may further damage tissue, increase bleeding or drive dirt and debris deeper into the wound. 1:20 dilutes betadine solution can be used to wash the surrounding area, but care should be taken to avoid getting further fluids into the wound itself other than straight saline. KY lubricating jelly can be placed in a wound to allow cleansing of the very dirty surrounding areas. Once clean KY lube can be easily rinsed from the wound with saline.
Stress or traumatic injuries, such as bowed tendons, will benefit from being hosed or iced for 15-30 minutes prior to applying a pressure bandage twice daily.
PRESSURE BANDAGES
If an open wound is involved, gauze pads, a clean cotton pads, sanitary pads or other sterile, non-stick dressing should be placed over the wound. If the wound is dirty, a 1 litre bag of saline can be used to flush out the wound prior to bandaging prior to your vet's arrival. Do not use sheet or roll cotton directly against a wound and do not apply wound spray powders or non water based crèmes. While roll cotton is absorbent and provides excellent padding, the fibers will stick to the tissue and contaminate the wound.
Once the wound or injured leg is covered, you should use roll cotton, sheet cotton, AMD gauze or leg quilts to pad the bandage. Adequate padding is essential to distribute pressure evenly around the limb. Padding should be at least two inches thick to help ensure adequate blood flow and uniform compression against the leg. This will allow you to apply sufficient tension to the support bandage vet rap or polo to control bleeding and swelling. Extra padding will also absorb drainage from the wound. In general, the longer a bandage is to remain in place, the greater the amount of padding needed.
Track or polo wraps, cotton flannels, roll gauze, bandaging tape, elastikon, ace bandages can all be used for the external (pressure) layer. Bandaging material should be at least three to four inches wide. This will help prevent a tourniquet effect and allow for sufficient overlap of the layers. Using stretch fabric makes bandaging easier, allows for movement and is less apt to restrict circulation as long as it is not pulled too tightly.
10 BASIC GUIDELINES: Keep it simple

1. If blood loss or exudate from the wound (sutured or unsutured) does not appear excessive, clean the wound with individual 3x3 sterile dry gauze pads, removing as much dirt, hair and debris as possible prior to bandaging. Do not use peroxide or other strong disinfectants as while they may kill germs they can also be deleterious to the regrowth of healthy tissue. On subsequent bandages also remember to clean exudate from wound margins or excess medications previously applied as to avoid a build up medication and to help keep the leg clean under the bandage.
2. Cover open wounds with sterile, non-stick gauze or dressing. Different phases of wound healing require different types of dressing to maximize the speed that wounds heal. Do not apply sprays or chemicals to wounds that may need to be repaired. Water-soluble ointments can always be used; petroleum based ointments should not be used in surgically repairable injuries.
3. Apply soft, absorbent padding, such sheet cotton, 6 inch cast padding or 4 inch AMD gauze, at least one inch thick around the injured limb. Make sure it lies flat and wrinkle-free against the skin. If extra padding is required beyond one inch thick, we suggest 6 inch brown gauze be uniformly applied over the padding to uniformly compress it prior to vet rap and elasticon.
4. To prevent slippage, begin the support bandage at the foot, covering the heel bulb and coronary band (where hoof meets hair) and work up the leg.
5. Where possible, always extend the pressure bandage 4-6 inches above the injury site. If the injury is in the lower leg, always bandage to the knee or hock. Utilize a standing wrap over the wrap being applied for the wound as to discourage your primary wrap from slipping distally on the leg.
6. Wrap the leg front to back, outside to inside (counterclockwise on left legs, clockwise on right legs).
7. Spiral support fabric upward, overlapping each proceeding layer by 50 percent.
8. Use smooth, uniform tension on the bandage to compress the padding without forming lumps or ridges beneath the bandage..
9. Apply sufficient pressure to control the bleeding, but do not wrap so tightly that you cannot slip a pinky finger inside the bandage.
10. Do not wrap too loosely as the pressure bandage will not do its job.
SPECIAL CONSIDERATIONS
- A pressure bandage placed to stop blood loss should only be left in place until your vet arrives.
- Be prepared to show your vet where the injury is with picturesPoint out the exact location of the injury so we can avoid disturbing it when removing the bandage. In the event of a penetrating injury to the sole attempt to leave the object in place and cover with a bandage so as not to allow the sole to place full weight. This will enable us to more accurately determine the soft tissue structures involved with the puncture.
- If blood soaks through the bandage, place a second bandage over it as before. Do not remove it, as this could disturb any blood clots that may be forming and encourage more bleeding.

- Monitor and evaluate the horse frequently. Remember, pressure bandages can be dangerous. If swelling develops above the bandage or lameness increases, check to see that the bandage is not cutting off the circulation and seek advice as to the possibility of a bandage bow.
- Watch for other problems. If the horse loses its appetite or there is an elevation in body temperature greater than 101.5F, call us. If the bandage appears to be too tight, cut through the support layers, leave them in place and wrap the new bandage around the first one more loosely.
- Extreme emergencies include injuries that do not stop bleeding within 15 to 20 minutes, lacerations that extend into joints and tendons and severe breakdowns or injuries in which the horse is unable or unwilling to walk. In any of these situations, call us immediately.
If you have never bandaged a horse’s legs, ask us for a demonstration to demonstrate the proper techniques and order of required materials.
WE NOW OFFER CARE CREDIT
Our payment policy has always been to obtain payment at tome of service. To help in those situations where finacing is needed we have begun offering Care Credit as of April 1, 2025. Providing quality care to our patients is our goal but we realize that sometimes ideal treatment can be costly and difficult to afford. We provide an affordable payment program that allows you to extend your payments over 180 days interest free. You can finance 100% of the treatment and make affordable monthly payments. Next time you are in the office apply, or we can send you an application to apply for this line of credit for your horse's medical and surgical needs.
Chuck
Chuck Maker DVM
Alpine Equine Hospital-PC 17776 Hwy 82-Carbondale-CO 81623
Office appointment desk: 970-379-7100 Office Fax: 970-510-7332
Office emergency cell: 970-366-1320
www.alpineequine.net and https://alpineequine.vetsfirstchoice.com/